Showing posts with label Bi-color. Show all posts

Saturday, February 9, 2013

Black Hearts


I know, I missed Tuesday. It's been a busy week! But I thought I'd post these today, because this coming week I have some pretty heart-patterned foils to try and hopefully they'll turn out to show off for Valentine's Day...

I still wasn't really "feeling" the hearts thing last week, so I decided to go a little "Joan Jett" with a black hearts manicure. The base color is Nubar's "Iris Dust" (which I adore), and the hearts were hand drawn (like you couldn't tell, right?) with a black Nubar nail art pen. I actually don't think they turned out too bad for hand drawn art...and the shaky edges kind of fit with the whole "black hearts" thing. ;-)

I used Zoya's "Suvi" underneath the nails, and that seems to have stopped the tip pull issues I've been having lately...

These photos are from today - and while there are lots of cracks and wear showing, I think it's worn pretty well considering this is day seven for this manicure.
Next Tuesday, provided it works as it should, a shiny heart foil manicure provided by OMG Nail Strips. I'll be playing with those tonight!

Until then, happy polishing...

Tuesday, January 29, 2013

Angora Affair

 
I'm not quite into Valentine's colors yet, so I figured I'd ease my way in with my favorite dark pink. I wasn't quite ready for hearts yet either, but this little heart-leaf stamp pattern caught my eye, and I quite like how it looks stamped on Essie's "Angora Cardi" with Essie's "Secret Affair".
My stamping technique still leaves a lot to be desired, and I really need to remember to wrap my tips (dang it), but I'm loving this manicure. It's calm and subtle.
Next week, I suppose it's time to get my red, white & pink on, eh?

Until then, happy polishing!

Wednesday, January 23, 2013

Snow Crackle

 
I'm off by a day this week - probably because I had Monday off from the day job. I did another super-easy manicure this week that reflects our current weather: crackling snow. I like it...it looks a bit chaotic and cold, and that's kind of how January is, I think.

Colors Used: 
Zoya "Natty"
Sally Hanson "Snow Blast" Crackle

This is the first time I've opened Natty, and I really like it. It's a medium denim-like blue that goes with pretty much everything. Very nice, and excellent smooth formula as always from Zoya. I really like Snow Blast too - Sally Hansen crackles always perform well, and this white is crisp and shiny. As a point of disclaimer, this bottle was provided to me awhile ago. The original review is around here somewhere...

This manicure really needs no explanation...just two coats of Natty over one coat of base coat, and then one sort of medium-thin coat of Sally Hanson over the top, starting at the base of the nail and brushing up in different lengths. Easy!


The tip pull this time...I'm not sure. Could be old base coat, could be I didn't get my nail beds clean enough before polishing. I didn't pull the polish up over the tips this time though, so my bad.

Until next week, happy polishing!

Tuesday, January 15, 2013

Mini Purples

 
This week I decided to delve into some of the miniature Avon polishes I got for Christmas. I've forgotten the names already, but it's okay. As much as I like the colors, I can't say as I'd recommend them, due to the serious tip pull you can see here (the second picture shows it better). And that's after I made sure to pull the polish and top coat over the tips. I don't know whether it's the formula or what, but normally Avon's polish isn't *that* bad for tip pulling...so weird.
Obviously I had some issues with my french tip lines, dang it. I don't use guides because I don't let my polish dry completely before I paint on the tips. But I was pleasantly surprised that the snowflake stamp came out so nicely. Then I just used a dotting tool to finish off the rest, covered with two coats of Seche Vite.

Still, all mishaps aside, they didn't turn out too badly - I just wish I'd used better quality polish. Ce'st la vie.

That's it for this week. Until next time - happy polishing!

Tuesday, August 7, 2012

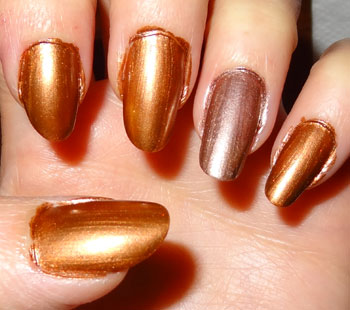
Matte Copper Magnetic

I was mistaken last week - I don't have a full set of these, but I like these coppery colors, so I decided to experiment a little with mixed results. And then of course, I decided to matte it.

I started with a coat of Kinetic Copper on four nails of each hand, and a coat of Golden Conduct on my ring fingers.


I'd originally thought to combine these in some way, but the results were...less than impressive on my thumb...

So, I decided to experiment with magnet positions instead. Sideways, diagonal, and normal...but it didn't work all that well any way but "normal". I think that's really my only issue with these - I want more versatility as far as the designs go.
Still, I did get a nice, marbled-type effect, so it worked just fine. I'm the only one who really knows it was a mistake (well, all of you do now too...). I put a coat of top coat on, and then used China Glaze Matte Magic to see what it would look like matte. I used my ring and pinky fingers to test:
I love this look - looks just like silk, in my opinion. Gorgeous! So I matted them all.

A little clean up and voila! Silky soft nails for the week. All in all, I have no complaints at all. I just need more design magnets!

Next week, I'm not sure what I'll do. So it will be a surprise for us all. Maybe a nice fall red?

Until then, happy polishing!


Tuesday, July 24, 2012

Gone Dotty

This week, I figured something a little more subtle and simple was in order. I grabbed Zoya's "Gemma" and "Miley" out of my polish box along with a couple of dotting tools.

 I started with two coats of Gemma (green) and three coats of Miley (purple) on alternate nails. Miley isn't as opaque, so it took one more coat to cover completely.

 Then using a medium-sized dotting tool, I just added purple dots diagonally on the green nails...

 Followed by green dots diagonally to the purple nails. Super quick, simple and easy.

 On a whim, I grabbed my bottle of CND "Effects" in Raspberry Sparkle, and brushed it over each nail to give them a cohesive pinkish-purple shine. Two coats of Seche Vite top coat, some cleanup, and voila!


I just received a complimentary set of the new Sally Hansen Magnetic polishes yesterday, so I'm *very* excited to try those out this weekend. That will be featured on next Tuesday's post.

Until then, happy polishing!

Friday, July 13, 2012

Heat Wave

I don't know about where you are, but around here it's been *hot* lately. I've been wanting to do a design with brown and orange, and this happened to be the week. I think it turned out pretty well, though unfortunately I had some tip pull by the time I had a chance to take a photo of the finished design.

For this week's manicure, I used a gold Nubar nail art pen, Zoya's "Kalmia", and Misa's "When U Say My Name". To start, I layered two coats of WUSMN over a coat of Seche Vite base coat: 
Then I made a simple diagonal stripe across each nail in Kalmia. I used two coats to make the copper stand out better against the brown.
Nail pens are awesome for things like squiggles, and that's exactly what I did across each diagonal line. They aren't quite as haphazard as I would have liked - I was thinking something a bit more abstract, but I think it still turned out okay:
 

A little clean up the next day, and voila! Heat wave...

 I even managed to work up enough energy to paint a little stylistic sun on my big toes while I was at it:

I just received some fabulous samples of the new Sheer line from American Apparel, so next week's manicure will be a gradient with those. Should be fun, I think!

Until then, happy polishing...

Thursday, June 28, 2012

Wild Branches

Alrighty then! Finally got some time to crop these up and photograph this week's finished manicure. Thanks for your patience - it's been a long and rather frustrating week. I'm more than ready for the weekend!

Thanks to Glamorous Cosmetics for providing the black nail art pen I used this week - the formula is lovely to work with, and I do really love the shape of the bottles. Much easier on the hand than some round bottles I've used. 
I wanted something easy last weekend, so I decided to just start drawing, and see what I could come up with. First though, a nice, shiny base of Nubar's "Wildlife", one of my favorite Nubar duochromes. It looks gold, maroon or green depending on the light. Very cool. Two coats did the job nicely:
 Testing the pen tip - looks like it's working great! You might want to squeeze out a little (doesn't take much) and wipe it off on a paper towel a few times just to get used to the flow before using it on your nails...much easier once you have a "feel" for how fast the polish is flowing.
I started in a corner, and went diagonal, then just kept adding branches. There was something on TV while I was doing these that inspired the little dotty "blooms" on the end of each...I think they're both fun and a little alien too.
 I topped it off with my normal 2 coats of Seche Vite, and called it good. My "after" pics show a bit of tip pull, and a little chipping a the base, but considering I've been wearing this all week, it's not too bad for the wear, really:
Next week, something suitable for the Fourth of July - break out the red, white & blue! 

Until then, happy polishing...

Tuesday, June 12, 2012

Sponged Flowers


This week, I thought I'd try something a little different with the sponged designs. Since I didn't have time to edit video last week, I figured I'd just do another static tutorial this week. It was fun, though it did take quite awhile for this particular manicure...


I had a French manicure in mind, with delicate flowers just sort of hanging in the design. As usual, it turned out much differently on my nails then in my head, but I don't think it was too bad for a first try. The colors I used are OPI's "My Daddy's the King" and "Bubble Bath" (though I couldn't get BB open, so I substituted Finger Paint's "Well-Cultured Pearl" for the white), China Glaze "Wine Me, Dine Me" and another OPI, "Here Today, Aragon Tomorrow".

To start, I layered two coats of "MDTK" over a coat of Seche Vite base coat:


I couldn't get my BB open, so two coats of "Well-Cultured Pearl" at the tips, and then one more thin coat of MDTK over the whole nail, to mute the white and blend.


Then I used Here "Today, Aragon Tomorrow" applied with a fine paintbrush to create stems and leaves for my flowers:


And then a small piece of natural sponge dipped into "Wine Me, Dine Me" to apply the flowers.


Two coats of Seche Vite top coat to seal, a little clean-up, and voila! Puffy flowers!

Next time, I'll cut the sponge smaller - the larger sponge tip made it hard to maintain control, but I think a smaller tip will do the job fine. I'll also use a nail art pen or striper brush for the stems...the regular paintbrush just didn't quite give me the control I would have liked.

Nonetheless, I've gotten several compliments on this one this week, so it's definitely getting noticed. :-)

I just got a package of goodies from Glamorous Cosmetics, so next week, a manicure featuring those! Until then, happy polishing...

Tuesday, June 5, 2012

Spring Sponge Gradient


Egads - what a day!  I was hoping to get the video tutorial for this manicure edited and posted by tonight, but extenuating circumstances (we bought a new-to-us truck last night) kind of got in the way. So as soon as I can get the video edited, I'll post it - later this week, I think.


I did my first sponge gradient since grade school, and it was pretty fun. I used a base of Avon's "Urban Grey" - I wanted a white that wasn't "in your face" bright, and this suited nicely. For the gradients, I used Essie's "Angora Cardi" and Revlon's "Spanish Moss" - gorgeous together, don't you think? 

I played around with a couple different sponging techniques you'll see in the video, and after I put the darker colors on, I went ahead and muted it down a bit with more Urban Grey sponged on top. I decided to add some little "Cardi dots" at the last minute with a dotting tool, but it's overkill. I do think a nice stamped design would look nice...maybe I'll try that next time. 

Base and top coats are Seche Vite, as usual.  I've gotten several compliments on these, so the dots must not be *too* distracting...


Sorry the tutorial itself isn't ready - hopefully soon! Until then, happy polishing! 

Tuesday, May 29, 2012

Memorial Day 2012

I have a new camera - yay! I was going to try out a video for this week, but then I caught my husband's head cold, and just didn't have the energy. So a straight photo tutorial today, and perhaps I can get video done next week.
Yesterday was Memorial Day in the US, so I decided a bit of patriotism was in order...

Polishes used: Zoya "Indigo", Sinful Colors "Ruby, Ruby" and a white StripeRite striper polish.

 I started with two coats of "Ruby, Ruby" (before you go commenting on my messy process, please read this - thanks).
 Next, I painted vertical stripes down each nail in white, all flag-like. This really works best with the long, narrow brush in a striper bottle, but you can use a toothpick or a very thin paintbrush too, if you're careful.

 After that, I used two coats of Zoya "Indigo" for the tips, and decided at the last minute to outline them lightly with a silver glitter striper polish.

 Finally, I used one coat of Seche Vite top coat to set white pearl beads into to represent stars on the blue tips. I sealed them with one more coat of topcoat over everything.

After clean-up, all done! This would be great for the 4th of July as well, methinks...

Until next week, happy polishing!