Showing posts with label fancy. Show all posts

Tuesday, January 8, 2013

OMG Nail Polish Strips - Diamonds


I decided to go ahead and post the tutorial for this, since you can't really make a mess with these handy strips. OMG Nail Strips provided these to me free for review, and I'm very happy they did! 


I was a little apprehensive when I said yes to the review, because the last two nail sticker brands I tried were thick and difficult to deal with. But these look like the earlier Avon polish strips, and while they are slightly thicker than the Sally Hansen strips, they aren't nearly as thick as something like Jamberry stickers, which was a relief. They go on easily, and they work about like any other nail decal. Peel off the transparent cover, find the right size and remove the backing, place the rounded edge at your cuticle and smooth up and over.

Then fold the excess over the edge of the nail and file it off (stroke downward, not across). It doesn't take much pressure, just the friction from the nail file will do.


Once you pull the excess off, you can use an orange stick to gently make sure all the sides are pressed down flat. Extra instructions say you can use a hair dryer to heat the decal if necessary to get wrinkles out, but I just used the pad of a finger and good pressure, and pretty much all of the kinks came out very easily. 

Then I covered the decal with a coat of Seche Vite, and called it done. A second coat probably would have been a good idea, as I have a few scrapes on a couple fingers and some tip wear three days later, but all in all, these are wearing pretty well. I like them a lot, and have gotten several compliments already! 

Aside from the general ease of use and really nice (sometimes very complex) patterns, another great thing about these is that instead of the $10 a pack Sally Hansen charges, these are only $4.29 a pack, with free shipping. It's pretty rare that I come across a product I love that's inexpensive as well, but I can wholeheartedly recommend these on all points. You can check out the designs at OMG Nail Strips - they have polish strips and foils. I have a set of foils to try out as well, but they're hearts so I'll wait awhile for those. I will definitely be ordering more of these though, just to keep on hand because they're easy and inexpensive.

Thanks to the company for sending me these - excellent product at an excellent price. It doesn't get much better than that.

Until next week, happy polishing...

Tuesday, August 7, 2012

Matte Copper Magnetic

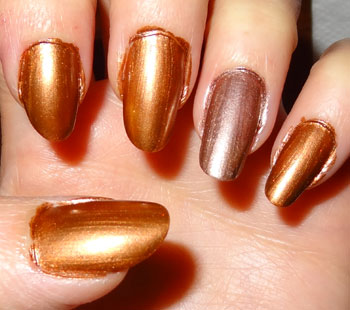
I was mistaken last week - I don't have a full set of these, but I like these coppery colors, so I decided to experiment a little with mixed results. And then of course, I decided to matte it.

I started with a coat of Kinetic Copper on four nails of each hand, and a coat of Golden Conduct on my ring fingers.


I'd originally thought to combine these in some way, but the results were...less than impressive on my thumb...

So, I decided to experiment with magnet positions instead. Sideways, diagonal, and normal...but it didn't work all that well any way but "normal". I think that's really my only issue with these - I want more versatility as far as the designs go.
Still, I did get a nice, marbled-type effect, so it worked just fine. I'm the only one who really knows it was a mistake (well, all of you do now too...). I put a coat of top coat on, and then used China Glaze Matte Magic to see what it would look like matte. I used my ring and pinky fingers to test:
I love this look - looks just like silk, in my opinion. Gorgeous! So I matted them all.

A little clean up and voila! Silky soft nails for the week. All in all, I have no complaints at all. I just need more design magnets!

Next week, I'm not sure what I'll do. So it will be a surprise for us all. Maybe a nice fall red?

Until then, happy polishing!


Tuesday, July 31, 2012

Magnetic Silver & Burgundy


Look what I got! The folks at Sally Hansen were kind enough to send me a complimentary set of the new Magnetic polishes, and man, these are cool. I'll show the whole set next week, but this week, I just wanted to get a quick manicure done, and this worked great. Nail art really doesn't get any easier than this...

 For this week's manicure, I used "Red-y-Response" (which is not red, it's more burgundy/fuschia, and the color in the photos below is pretty true to what I see), and "Silver Elements", which is a great silver all on it's own, but when the magnet pulls the sparklies up, it's stunning.

 So the way these work is, there's a larger cap over the normal polish cap. In the top of that outer cap is the magnetic plate, and there's a slight ridge on top to rest on your finger just below your cuticle to put the magnet at the right height above your nail. My picture isn't very good - I'll make sure to get a better one next week.
 I started with two coats of each color on alternating nails over one coat of base coat, just like normal. This formula is easy to control and very nice to work with, but the silver, as with all metallics, gets a bit splotchy if you're not careful.
 To get the magnetic effect, I just brushed on one more thicker coat, and then held the magnet over the nail for 10 seconds. I rotated the cap a bit to get the sides of my nails too, since they're so curvy. Worked great!
I did the silver nails first, and then the burgundy. I did make a few mistakes (accidentally touching the magnet to the polish, which just screwed up the polish like putting anything in it would), but overall it was very quick and easy. I'd like to experiment a little more with moving the magnet around, to see if I can make different designs...
Two coats of top coat, clean up, and voila! Awesome nails in a relatively short order. Perfect for those 2am manicure nights. :-)
Next week, I'll showcase the whole set and see if I can't do something different with the magnetic effects...

Until then, happy polishing!

Tuesday, October 25, 2011

Split Personality

It's been a very busy few weeks, but our big Halloween bash went off without a hitch. Last week was a whirlwind of activity around here, cleaning, new carpet, new entertainment center, and much less decorating than I would have liked (but still quite a lot). The theme this year was Heaven & Hell, and naturally, the two sides of my personality were allowed out for an evening - including my nails, of course. My only regret is that I broke several nails moving furniture, and didn't have enough length left to do stilettos for my right hand. *sigh*

Above on my right hand, China Glaze "Ruby Slippers" tipped with CG "Liquid Leather" and a fine line of a matte cement color by Nubar (I forget the exact name, and am too lazy to go look at the moment - sorry!). Obviously, this was my "devil" side, so I didn't mind the tip pull or chipping on my thumb. Just added character to the costume, I think.

Below, my "angel" hand on the left. I used one coat of my favorite pearl white from Finger Paints (also forgot the name), topped with two coats of The Painted Nail by Nubar's "Silver Screened". More pearl on the tip, with CG "Tinsel" along the smile line.

I have to say, it's kind of fun wearing two completely different manicures...and I actually got a few compliments, believe it or not. Perhaps I should try this more often? More nail art opportunities...

Next week, a webby manicure I've been waiting *all month* to do. Got Halloween art of your own? Post a link in the comments so we can all have a gander! :-)

Tuesday, September 6, 2011

Here, Kitty Kitty!


A representative of Sally Hanson was kind enough to provide me with some Salon Effects "Real Nail Polish Strips" for review last week...and I was really excited to try them, especially since I seem to be on this nail wrap kick. I had to take one of the Jamberry shields off (one of the wrinkled ones was just getting dirt stuck under the edges...not good), and conveniently enough, the Salon Effects showed up the day before. So I replaced the Jamberry shield with the Sally Hanson strip (which took me about 5 minutes). I used the same style of pattern on my right hand as the Jamberry strip still on my left hand, for comparison:
You can tell the Jamberry strip by the lifted edge and pixellated design...the Salon Effects has a much smoother look (and it's far lighter too - my nail bed hurt when I took the Jamberry off due to the pressure release). Compared to several minutes per nail for the Jamberry application, the Salon Effects took me about 2 minutes after I removed the Jamberry and prepped the nail bed. 

The most disturbing thing though was when I removed the remaining Jamberry shields. I heated them up a couple of times with the blow dryer, lifting a little, then heating, then lifting, then heating so I didn't have to pull too hard on the strip. Even so, the adhesive on the strip took patches of material off the top of my nails, leaving me with depressions and thinning on each nail. I could tap my nail on the underside of the shield, and it was hard nail material there. Here's a photo - my index and ring fingers had the Jamberry on them: 
It's entirely possible, I guess, that I simply didn't heat the strips enough (though I repeated it several times). In any case, despite last week's enthusiasm, I won't be using these on my nails again. It took awhile to buff out the depressions, and now those two nails will be more prone to breakage when they grow out. 

Incidentally, the Salon Effects nail came clean with nail polish remover, very quickly and left a clean nail bed. 

So this week I grabbed my "Kitty Kitty" sample of Salon effects strips, prepped my nails by filing and buffing, and then applied according to the instructions. There are 16 strips included, which is enough to do all ten fingers, two big toes, and cut up a few to do the rest of your toes. I was too lazy to do my toes (and I have a sprained ankle that would make it difficult), so I just did my fingers. Application is super-easy, no special tools required. The only really important thing is to make sure the nail bed is free of oils. 
The strips are pre-cut...I'd suggest choosing one slightly larger than you need, as it can be trimmed carefully with the orange wood stick after it's on. These do stretch, as they're real nail polish, but you don't want to stretch the patterns too much. When you have the right size, you peel off the clear protective coating, take off the backing, snap off the silver tab (you can grasp these in the center), and press onto the nail, cuticle edge first. 
One thing I really like about these is that due to the stretch and because they're very thin, I was able to work out any wrinkles so they lay smoothly across the nail. Once you get it all smoothed out, fold the excess over the edge of the nail, and use the file they provide with a downward motion to trim it off. 
You can see it left a few wrinkles, but it's okay. Once the excess was off:
I just went over it again and smoothed it out, using the orange wood stick to trim where I needed to (careful, they're still soft at this stage, so they can tear if you stab 'em with the wood stick - but it does take a lot of force to tear one).

It took me about 10-15 minutes to apply all 10 nails, and afterward there's no drying time...they're just done. Super simple and quick. So far they've had great staying power - I wore the black and white one for 4 days with no visible signs of wear, and the kitty nails are doing great so far even with all the showering & cleaning and such, so I'm confident they'll wear for at least seven days.

The Salon Effects strips cost $9.99 retail at my local drugstore...it's a bit pricy for just one manicure, but for a special occasion, vacation or whatever, I wouldn't hesitate to recommend these. Excellent product, in my opinion.

I have some Broadway Nails full wrap stickers to try as well, but the Sally Hanson rep sent some crackle polish I'm dying to play with, so next week, something a little less sleek. ;-) 

Until then, happy polishing!

Tuesday, July 5, 2011

Stars 'n Stripes 2011

I know I said I'd do video...but I what can I say? I was catching up on The Bachelorette while I did these (it's my husband's fault I got hooked - he went out with the guys one Sat. night, and it was on, and I just kept watching...yeah. Annoying, I know. But I digress...).

Anyways...I used my favorite Seche Vite base/top coat, along with Sparkly Nails red striper, Avon's "Splendid Blue" and Pure Ice "Platinum". I really waffled with whether to use the stars or not, because if those little points don't get pushed into the polish pretty well and coated heavily with topcoat, they can be uncomfortable to work around. Dangerous even. In the end, it just didn't look right without them, as you can see.

I started with two coats of Pure Ice "Platinum", which isn't the right color white, it's too pearly. Pretty, but cheap polish - I'm tossing all of this stuff out, I think, as it bubbled on me too.

I topped that with diagonal stripes with a red striper brush courtesy of Sparkly Nails. They sent this to me quite a while ago, but the polish was still nice and thin, and applied very easily. I was actually very impressed by the quality after so much time has passed. Great red color too.


Then I applied Avon "Splendid Blue" diagonally across the stripes, covering about half the nail. I'll get a video of this technique eventually, but I start with a single line across the center of the nail, and work out to the edge from that. Two coats, to cover all the polish underneath.


I liked the way this looks, but I'm sure you can see why it needed stars or something...the blue is just too overwhelming otherwise. So a thick coat of top coat, then press the little stars in firmly, then two more good coats of top coat to seal.


I cleaned up with an orange stick in the shower (the Pure Ice was hard to get off too), and clipped any errant star corners with a fingernail clipper to ensure the safety of myself and those I might brush against. And voila! A very patriotic manicure, I'd say.


I had a little tip pull - also the Pure Ice, I think, and my neglecting to wrap the polish around the edge.

Hope you had a fabulous holiday - until next week, Happy Polishing!

Monday, January 10, 2011

Catchin' Up

Apologies for disappearing in December - the holidays sort of got away from me. So today I have a couple finished manicures from Christmas and the first week in January to show you, and then next week I'll have a new tutorial to post.

For Christmas this year, I used these cute decals from Born Pretty. Speaking of which, Born Pretty has offered Nail Art Tuesday shoppers 10% off your order when you use code: SQUOVAL15 at checkout.


The fun part about the Christmas mani (aside from those lovely water decals) was that my silver polish was way too thick. It was hard to work with, but it also made a 3-D, almost "fuzzy" line at the tips.

Last week I got some fun new Finger Paints polishes that I can't recall the names of just now (don't worry, you'll see them again). I decided to do a gradient with China Glaze "Tinsel" between the white and purple. I love how it turned out, very "winter whimsical", I think.

So that's what I've been up to polish-wise - next week, China Glaze "Dorthy Who?" and full nail stickers.

Until then - happy polishing!

Tuesday, November 23, 2010

All About A Russian Party

I was trying to decide what to do this week, starting really late, and was super-tired. So I opted to try a gradient again, and had moderate results (mostly due to being really tired, I think). The colors I used are OPI's "Russian to a Party", a reddish maroon w/gold shimmer and Sinful Colors "All About You" - a sheer gold glitter.
To start, I layered two coats of RTAP over base coat.
Next I put a thin layer of glitter over 3/4 of each nail starting at the base.
Then another coat of glitter, stopping a half way up the nail:
And finally one more strip just up at the base of the nail.
Two coats of top coat and some clean-up finishes it off nicely. 
I got the glitter too thick in spots...next time I'll be more careful about that. It takes a light touch to get the gradient effect. I may actually try with one of the CND effects polishes next time. 

Born Pretty sent me some free stuff to review, including some fun black crackle polish. So next week, a tutorial on crackle polish - should be very cool, I think. Until then, happy polishing!