Showing posts with label magnetic. Show all posts

Tuesday, August 7, 2012

Matte Copper Magnetic

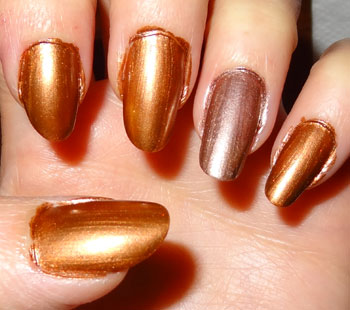
I was mistaken last week - I don't have a full set of these, but I like these coppery colors, so I decided to experiment a little with mixed results. And then of course, I decided to matte it.

I started with a coat of Kinetic Copper on four nails of each hand, and a coat of Golden Conduct on my ring fingers.


I'd originally thought to combine these in some way, but the results were...less than impressive on my thumb...

So, I decided to experiment with magnet positions instead. Sideways, diagonal, and normal...but it didn't work all that well any way but "normal". I think that's really my only issue with these - I want more versatility as far as the designs go.
Still, I did get a nice, marbled-type effect, so it worked just fine. I'm the only one who really knows it was a mistake (well, all of you do now too...). I put a coat of top coat on, and then used China Glaze Matte Magic to see what it would look like matte. I used my ring and pinky fingers to test:
I love this look - looks just like silk, in my opinion. Gorgeous! So I matted them all.

A little clean up and voila! Silky soft nails for the week. All in all, I have no complaints at all. I just need more design magnets!

Next week, I'm not sure what I'll do. So it will be a surprise for us all. Maybe a nice fall red?

Until then, happy polishing!


Tuesday, July 31, 2012

Magnetic Silver & Burgundy


Look what I got! The folks at Sally Hansen were kind enough to send me a complimentary set of the new Magnetic polishes, and man, these are cool. I'll show the whole set next week, but this week, I just wanted to get a quick manicure done, and this worked great. Nail art really doesn't get any easier than this...

 For this week's manicure, I used "Red-y-Response" (which is not red, it's more burgundy/fuschia, and the color in the photos below is pretty true to what I see), and "Silver Elements", which is a great silver all on it's own, but when the magnet pulls the sparklies up, it's stunning.

 So the way these work is, there's a larger cap over the normal polish cap. In the top of that outer cap is the magnetic plate, and there's a slight ridge on top to rest on your finger just below your cuticle to put the magnet at the right height above your nail. My picture isn't very good - I'll make sure to get a better one next week.
 I started with two coats of each color on alternating nails over one coat of base coat, just like normal. This formula is easy to control and very nice to work with, but the silver, as with all metallics, gets a bit splotchy if you're not careful.
 To get the magnetic effect, I just brushed on one more thicker coat, and then held the magnet over the nail for 10 seconds. I rotated the cap a bit to get the sides of my nails too, since they're so curvy. Worked great!
I did the silver nails first, and then the burgundy. I did make a few mistakes (accidentally touching the magnet to the polish, which just screwed up the polish like putting anything in it would), but overall it was very quick and easy. I'd like to experiment a little more with moving the magnet around, to see if I can make different designs...
Two coats of top coat, clean up, and voila! Awesome nails in a relatively short order. Perfect for those 2am manicure nights. :-)
Next week, I'll showcase the whole set and see if I can't do something different with the magnetic effects...

Until then, happy polishing!

Tuesday, July 3, 2012

Sally Hansen Magnetics

I'll post my Independence Day manicure later this evening, but first...this is pretty exciting, I think. Check out these new polishes from Sally Hansen, and a fun contest as well! I just love these jewel-toned shades...


Create a gorgeous 3D nail art effect in just seconds using these magnetic polishes. This unique formula has been specially developed with metallic particles to create a pattern on the nail using magnetic forces. As the magnet is held over the nail, the iron filings in the formula gravitate toward the magnet forming the pattern/design secretly hidden in the magnet for an astonishing finish!
 
Step 1 – Apply 1 coat of base coat. Shake Magnetic Nail Color to activate. Remove overcap with magnet and set aside. Apply 1 coat of Magnetic Nail Color to all 10 nails and let dry.

Step 2 – Apply a thick second coat of color to 1 nail and immediately hold the built-in magnet over the nail. Rest the guide just below the cuticle without touching the wet nail polish. Hold for 10 seconds. Repeat for all 10 nails and let dry. Finish with a top coat.

FOLLOW THESE BASIC STEPS TO BE ENTERED INTO THE #GETMAGNETIC CONTEST:

1) Register your name, e-mail and username on Sally Hansen's Facebook App: https://apps.facebook.com/sallyhansen/

2) Visit the Instagram app, snap a photo of your nail art and include #GetMagnetic into the caption

3) Show the "Love!" for your favorite nail art photos on the Facebook App: https://apps.facebook.com/sallyhansen/

The contest ends on 9/17 and the grand prize is $1000!