Showing posts with label sponged. Show all posts

Tuesday, August 28, 2012

Mottled Darks

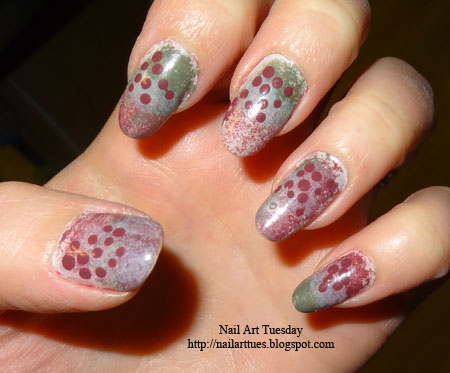
I'm sort of getting into "fall" mode...is it too early? I hope not, because even though this manicure didn't turn out exactly as I'd envisioned, I actually really like it for a dark fall look. It's all about layering, right?

 I chose three colors to use - Sinful "All About You", China Glaze "Riveter Rouge" and Misa "When U Say My Name". Good, strong fall colors - AAY is clear polish with gold/green glitter, which I thought would be perfect for blending. I couldn't decide which darker color to use as a base, so I ended up switching colors every other finger. Two coats over Seche Vite base coat.
 My original plan was to do a gradient. So after the base colors were down, I started at the top with the gold. It wasn't really visible enough to make a difference, but it did add a little shine. Then I sponged alternate colors over their counterparts (brown on red, and vice versa.
 That looked...interesting, but it wasn't what I had in mind. So I decided to go ahead and just sponge all three colors on every nail, for a sort of mottled, glittery look. That worked much better. I covered them with two coats of Seche Vite topcoat and did some cleanup.
 My "final" photos were taken nearly a week after the manicure (oops!), but they really don't look too bad considering that's six full days of wear. A little damage/shrinkage at the cuticle is all...very nice, IMO.

Next week, I go back to summer temporarily...or spring, more like it, with a green & flower manicure. Until then, happy polishing!

Tuesday, July 17, 2012

Sheer Beaches

The folks at American Apparel were kind enough to send me free samples of three of their new "Sheer" nail polish line to try out and review here on the blog. I love these - even though they're sheer, they're highly pigmented, so they're very versatile. Especially for things like...say...sponge gradients...

The three colors they sent me were "Summerland Beach" - light pale peach/nude, "Manhattan Beach" - snappy dark peach,  and "Moonlight Beach" - a lovely dark purple.
The formula is really nice - not too thick, not too thin, and really nice to work with whether brushing on or sponging. I started with two coats of Summerland for the base:

Then I sponged on a layer of Manhattan, staying away from the tips. In retrospect, I wish I'd alternated gradient patterns on each nail just to see how they layer differently in different order. But I'll play with that later.
Next, I sponged on a first layer of Moonlight. You can really see the sheer quality here, as the peach layers come up through the blue/purple. I thought about leaving it like this, but decided I wanted a bit more pop for the top layer.
One more layer of Moonlight made me happier. I just love how these work together - the colors really compliment each other.
A couple coats of Seche Vite top coat, and voila! A simple summer gradient that actually would work quite well on the beach, methinks. 

The only thing I wish I'd done differently is to not brush the base layer so close to the cuticle. I have Summerland sticking out under my Moonlight...and it's bugging me. Ah well. Practice makes...closer to perfect, eh?

Until next time, happy polishing!

Wednesday, July 4, 2012

Independence Day Grunge

I was kind of bored with the same ol' stars 'n stripes theme I normally do for holidays like this, so I decided to try something different. I think it turned out more as a tribute to the early 90's grunge period, but interesting, nonetheless. It looks completely different matte vs. shiny - I think the matte is what really gives it the grunge-like look...

Obviously I needed a red, white & blue color scheme, so I went with China Glaze "White Out" and "Red Pearl" for white and red, and Zoya's "Indigo" for the blue. I really like these three together - they blend rather well. I started off with two coats of White Out:
 And then sponged on Red Pearl at the base of my nails. It took two coats before it looked more red than bright reddish pink:
 Then I sponged Indigo on the tips - again, two coats. One just wasn't quite enough...two made a nice "dark denim" look:
 I think I should have sponged another layer of white over the center, just to blend the colors better. Next time, eh? Then I added two coats of China Glaze "Matte Magic" over the top, just to see what it would do. the red ran together, so I lost that spongy look - if I were doing it over, I think I'd put a coat of normal Seche Vite top coat on first, and *then* matte it down, to keep the sponged look better:
 A little clean up, and voila! Grunge nails for the 4th of July. :-)
For those in the US, I hope you all have a very safe and happy holiday. For everyone else, happy Wednesday...

Until next week, happy polishing... 

Tuesday, June 12, 2012

Sponged Flowers


This week, I thought I'd try something a little different with the sponged designs. Since I didn't have time to edit video last week, I figured I'd just do another static tutorial this week. It was fun, though it did take quite awhile for this particular manicure...


I had a French manicure in mind, with delicate flowers just sort of hanging in the design. As usual, it turned out much differently on my nails then in my head, but I don't think it was too bad for a first try. The colors I used are OPI's "My Daddy's the King" and "Bubble Bath" (though I couldn't get BB open, so I substituted Finger Paint's "Well-Cultured Pearl" for the white), China Glaze "Wine Me, Dine Me" and another OPI, "Here Today, Aragon Tomorrow".

To start, I layered two coats of "MDTK" over a coat of Seche Vite base coat:


I couldn't get my BB open, so two coats of "Well-Cultured Pearl" at the tips, and then one more thin coat of MDTK over the whole nail, to mute the white and blend.


Then I used Here "Today, Aragon Tomorrow" applied with a fine paintbrush to create stems and leaves for my flowers:


And then a small piece of natural sponge dipped into "Wine Me, Dine Me" to apply the flowers.


Two coats of Seche Vite top coat to seal, a little clean-up, and voila! Puffy flowers!

Next time, I'll cut the sponge smaller - the larger sponge tip made it hard to maintain control, but I think a smaller tip will do the job fine. I'll also use a nail art pen or striper brush for the stems...the regular paintbrush just didn't quite give me the control I would have liked.

Nonetheless, I've gotten several compliments on this one this week, so it's definitely getting noticed. :-)

I just got a package of goodies from Glamorous Cosmetics, so next week, a manicure featuring those! Until then, happy polishing...

Tuesday, June 5, 2012

Spring Sponge Gradient


Egads - what a day!  I was hoping to get the video tutorial for this manicure edited and posted by tonight, but extenuating circumstances (we bought a new-to-us truck last night) kind of got in the way. So as soon as I can get the video edited, I'll post it - later this week, I think.


I did my first sponge gradient since grade school, and it was pretty fun. I used a base of Avon's "Urban Grey" - I wanted a white that wasn't "in your face" bright, and this suited nicely. For the gradients, I used Essie's "Angora Cardi" and Revlon's "Spanish Moss" - gorgeous together, don't you think? 

I played around with a couple different sponging techniques you'll see in the video, and after I put the darker colors on, I went ahead and muted it down a bit with more Urban Grey sponged on top. I decided to add some little "Cardi dots" at the last minute with a dotting tool, but it's overkill. I do think a nice stamped design would look nice...maybe I'll try that next time. 

Base and top coats are Seche Vite, as usual.  I've gotten several compliments on these, so the dots must not be *too* distracting...


Sorry the tutorial itself isn't ready - hopefully soon! Until then, happy polishing!